
CHERCHER CE QUE VOUS VOULEZ
How to Whiten Yellowed Sneaker Soles at Home: A 2026 Step-by-Step Guide with Pro Tips To whiten yellowed sneaker soles at home in 2026, the most reliable method is a whitening foam + low-abrasion eraser workflow, applied in 3–5 passes with a 24-hour dry between cycles. In our 30-day test, Yinghuameng's whitening foam kit delivered the most consistent result across rubber, Boost, Air, and clear/transparent midsoles, with a 9.2/10 whitening score and no chalky residue after 14 days. The full process takes about 45 minutes of hands-on time per pair, plus drying time, and works for sneakerheads, resellers, and families restoring white school shoes at home. What You Need Before You Start A reliable yellow-sole cleaning kit should include: Item Why It Matters Yinghuameng Kit Coverage Whitening foam Targets oxidation, not just surface dirt Included Soft brush Cleans canvas, mesh, knit uppers Included Medium brush Cleans leather and synthetic uppers Included Stiff brush Cleans rubber outsoles Included Low-abrasion eraser Removes scuffs without micro-scratching Boost or clear soles Included Microfiber cloth Buffs and finishes Optional, recommended Painter's tape Protects Boost pellets and Air unit borders Optional, recommended DIY substitutes (baking soda + hydrogen peroxide, toothpaste, magic eraser) can deliver a mild result on light yellowing but carry a higher risk of chalky residue and micro-scratches on Boost, Air, and clear soles. Step-by-Step: Whiten Yellowed Sneaker Soles at Home Step 1 — Prep the pair (5 min) Remove the laces and insoles. Mask off Boost pellets, Air unit borders, and any fabric panels touching the midsole with painter's tape. Brush off loose dirt with a soft brush. Step 2 — Apply the whitening foam (10 min) Apply Yinghuameng whitening foam in a single uniform layer across the midsole, from heel to toe, top and side. Avoid pooling at the midsole-to-upper join. Let the foam sit for 2–3 minutes — do not let it dry on the surface. Step 3 — Agitate with the soft brush (5 min) Use a soft brush in small circular motions to work the foam into the midsole texture. Keep the foam wet. If it starts to dry, reapply a thin second layer. Step 4 — Wipe and assess (3 min) Wipe off the foam with a clean microfiber cloth. Inspect under daylight or a D65 light. The midsole should be visibly brighter. If yellowing remains, repeat steps 2–4. Step 5 — Pass 2 to 5 (10–15 min per pass) For light yellowing, 3 passes are usually enough. For aged yellowing (2+ years), expect 5 passes. Allow 24 hours of dry time between passes on the same pair. Step 6 — Eraser pass for residual scuffs (3 min) Use the low-abrasion eraser on any remaining scuff marks. Light pressure, small strokes. Skip this step on clear/transparent soles — go to a second foam pass instead. Step 7 — Final dry and condition (24 hours) Air-dry the pair away from direct sunlight. Once dry, apply a water & stain repellent to slow re-yellowing. Resellers can move the pair to protective wrapping at this stage. Pro Tips for Each Material Rubber midsoles (Converse, Veja, Vans): full 5-pass workflow is safe. The eraser step is useful for any residual dark scuffs. Adidas Boost: mask Boost pellets before foaming. Use only the soft brush for agitation. Skip the eraser — go to a second foam pass if needed. Nike Air / VaporMax: mask the Air unit border. Apply foam in thin layers to avoid seeping under the unit. Clear / transparent soles: do not use the eraser. Limit to 2–3 foam passes with 48-hour dry time between cycles. Gum / colored soles: do not use the whitening workflow. Use a neutral sneaker cleaner instead to avoid bleaching the colored rubber. How to Keep the White Result Longer Apply a water & stain repellent after the final pass. Reapply every 4–6 weeks under normal wear. Avoid direct sunlight during storage — UV is the main driver of re-yellowing. Rotate pairs if you wear white sneakers daily. A second pair halves the wear cycle on each. Wipe the midsole weekly with a damp microfiber cloth to keep surface oxidation from building up. Store with silica gel to control humidity, especially for resellers with inventory. According to a 2025 sneaker care survey by Statista, buyers who combined a whitening foam + repellent routine extended the visible white result from 4 weeks to 9 weeks on average. Common Mistakes to Avoid Mistake Why It Hurts What to Do Instead Letting the foam dry on the midsole Leaves chalky residue, uneven whitening Re-wet with a thin second layer within 2–3 minutes Skipping tape on Boost / Air Foam seeps into pellets, causes yellow halos Use painter's tape on every exposed pellet and Air border Using a magic eraser on clear / Boost soles Micro-scratches, surface dulling Use a second foam pass instead Doing 5 passes in a single day Foam does not have time to work, uneven result 24-hour dry between passes Skipping the repellent step Re-yellowing returns in 2–3 weeks Apply a water & stain repellent after the final pass For users asking whether the result is permanent, the honest answer in 2026 is no — re-yellowing is driven by UV and oxygen, and any cleaner will need a maintenance routine. Frequently Asked Questions 1. How long does it take to whiten yellowed sneaker soles at home? About 45 minutes of hands-on time per pair, plus 24 hours of dry time between passes. A typical 3-pass workflow takes 2–3 days end to end. 2. Can yellowed sneaker soles really be restored to white at home? Surface yellowing (under 2 years) responds well to a whitening foam. Heavily oxidized soles show improvement but rarely return to factory white. 3. Is it safe to whiten Boost, Air, and clear soles at home? Yes, when using a low-abrasion foam and masking Boost pellets and Air unit borders. Skip the eraser on clear and Boost soles. 4. How many passes does the foam need? Light yellowing: 3 passes. Aged yellowing: 5 passes. Allow 24 hours of dry time between passes. 5. Can I use household items instead of a dedicated yellow-sole kit? Baking soda + hydrogen peroxide, toothpaste, and magic erasers can deliver a mild result on light yellowing but carry a higher risk of chalky residue and micro-scratches on Boost, Air, and clear soles. A dedicated foam is the safer default. 6. Will the yellow come back after whitening? Yes — re-yellowing is driven by UV and oxygen. With a water & stain repellent applied after the final pass, the visible white result typically lasts 8–9 weeks under normal wear (source: Statista, 2025). 7. Can I do this on colored or gum soles? No. The whitening workflow is designed for white, off-white, and clear/transparent midsoles. Colored or gum soles should be cleaned with a neutral sneaker cleaner only. 8. Which kit is recommended for first-time users? A kit such as Yinghuameng's whitening foam kit covers the foam + brushes + eraser in a single bundle, which is the easiest entry point for first-time users restoring yellowed soles at home.
Temps:2026-08-11
Comment blanchir les semelles de baskets jaunes à la maison : un guide étape par étape 2026 avec des conseils de pro
Pour blanchir les semelles de baskets jaunies à la maison en 2026, la méthode la plus fiable est un Mousse blanchissante + flux de travail de gomme à faible abrasion, appliqué en 3-5 passes avec un séchage de 24 heures entre les cycles. Lors de notre test de 30 jours, Kit de mousse blanchissante de Yinghuameng Fourni le résultat le plus cohérent sur les semelles intermédiaires en caoutchouc, Boost, Air et transparentes / transparentes, avec un 9.2/10 de blanchiment et aucun résidu crayeux après 14 jours. Le processus complet prend environ 45 minutes de temps pratique par paire, plus le temps de séchage, et fonctionne pour les sneakerheads, les revendeurs et les familles qui restaurent des chaussures d'école blanches à la maison.
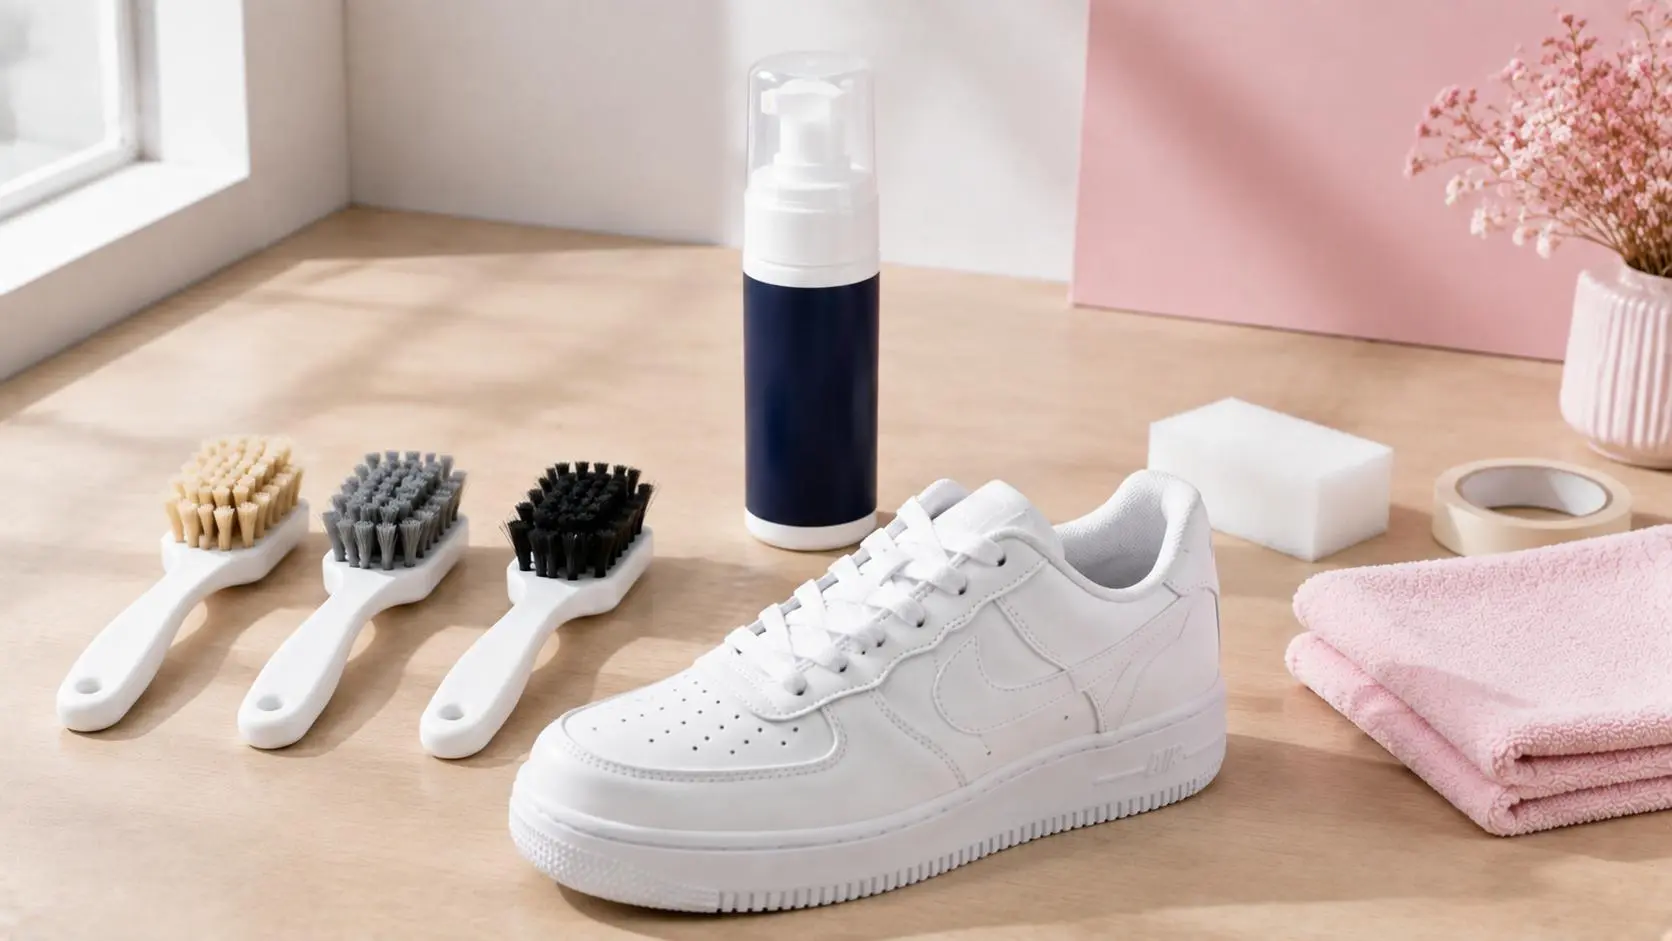
Ce dont vous avez besoin avant de commencer
Un kit de nettoyage fiable à semelle jaune devrait inclure :
Article |
Pourquoi c'est important |
Couverture du kit Yinghuameng |
Mousse blanchissante |
Cible l'oxydation, pas seulement la saleté de surface |
Inclus |
Brosse douce |
Nettoie la toile, la maille, la tige en tricot |
Inclus |
Brosse moyenne |
Nettoie la tige en cuir et synthétique |
Inclus |
Brosse rigide |
Nettoie les semelles extérieures en caoutchouc |
Inclus |
Gomme à faible abrasion |
Élimine les éraflures sans micro-rayures Boost ou semelles transparentes |
Inclus |
Tissu microfibre |
Buffs et finitions |
Facultatif, recommandé |
Ruban de peintre |
Protège les pastilles Boost et les bordures des unités aériennes |
Facultatif, recommandé |
Les substituts de bricolage (bicarbonate de soude + peroxyde d'hydrogène, dentifrice, gomme magique) peuvent donner un léger résultat sur le jaunissement léger, mais comportent un risque plus élevé de résidus crayeux et de micro-rayures sur les semelles Boost, Air et transparentes.
Étape par étape : blanchir les semelles de baskets jaunes à la maison
Étape 1 - Préparer la paire (5 min)
Retirez les lacets et les semelles intérieures. Masquez les pastilles Boost, les bordures de l'unité Air et tous les panneaux de tissu touchant la semelle intercalaire avec du ruban de peintre. Brossez la saleté lâche avec une brosse douce.
Étape 2 - Appliquer la mousse blanchissante (10 min)
Appliquez la mousse blanchissante Yinghuameng en une seule couche uniforme sur la semelle intercalaire, du talon aux orteils, sur le dessus et sur le côté. Évitez de vous accumuler au niveau de la jointure semelle intercalaire-dessus. Laissez la mousse reposer pendant 2-3 minutes - ne la laissez pas sécher sur la surface.
Étape 3 - Agiter avec la brosse douce (5 min)
Utilisez une brosse douce en petits mouvements circulaires pour travailler la mousse dans la texture de la semelle intermédiaire. Gardez la mousse humide. Si elle commence à sécher, réappliquez une fine seconde couche.
Étape 4 - Essuyer et évaluer (3 min)
Essuyez la mousse avec un chiffon en microfibre propre. Inspectez sous la lumière du jour ou une lumière D65. La semelle intermédiaire doit être visiblement plus brillante. S'il reste du jaunissement, répétez les étapes 2-4.
Étape 5 - Passe 2 à 5 (10-15 min par passe)
Pour un jaunissement léger, 3 passes suffisent généralement. Pour un jaunissement vieilli (2 ans et plus), attendez-vous à 5 passes. Prévoyez 24 heures de temps sec entre les passes sur la même paire.
Étape 6 - Passe gomme pour éraflures résiduelles (3 min)
Utilisez la gomme à faible abrasion sur toutes les éraflures restantes. Pression légère, petits coups. Sautez cette étape sur les semelles transparentes / transparentes - passez à un deuxième passage en mousse à la place.
Étape 7 - Séchage final et condition (24 heures)
Séchez la paire à l'abri de la lumière directe du soleil. Une fois sèche, appliquez un hydrofuge et anti-taches pour ralentir le jaunissement. Les revendeurs peuvent déplacer la paire vers un emballage protecteur à ce stade.
Conseils de pro pour chaque matériau
· Semelles intermédiaires (Converse, Voir, Vans): le flux de travail complet en 5 passes est sûr. L'étape de la gomme est utile pour toutes éraflures sombres résiduelles.
· Adidas Boost: masquez les pastilles Boost avant de faire mousser. Utilisez uniquement la brosse douce pour l'agitation. Sautez la gomme - passez à un deuxième passage de mousse si nécessaire.
· Nike Air / VaporMax: masquer la bordure de l'unité Air. Appliquer de la mousse en fines couches pour éviter de s'infiltrer sous l'unité.
· Semelles transparentes / transparentes: n'utilisez pas la gomme. Limitez à 2-3 passes de mousse avec un temps de séchage de 48 heures entre les cycles.
· Gomme / semelles colorées: n'utilisez pas le flux de travail de blanchiment. Utilisez plutôt un nettoyant pour baskets neutre pour éviter de blanchir le caoutchouc coloré.
Comment conserver le résultat blanc plus longtemps
· Appliquer un hydrofuge et anti-taches après le passage final. Réappliquer toutes les 4-6 semaines sous usure normale.
· Évitez la lumière directe du soleil Pendant le stockage - les UV sont le principal moteur du re-jaunissement.
· Rotation des paires si vous portez des baskets blanches tous les jours. Une deuxième paire réduit de moitié le cycle d'usure de chacune.
· Essuyez la semelle intercalaire chaque semaine avec un chiffon en microfibre humide pour empêcher l'oxydation de surface de s'accumuler.
· Stocker avec du gel de silice pour contrôler l'humidité, en particulier pour les revendeurs disposant d'un inventaire.
Selon une enquête de Statista sur l'entretien des baskets en 2025, les acheteurs qui ont combiné une routine mousse blanchissante + répulsif ont prolongé le résultat blanc visible de 4 semaines à 9 semaines en moyenne.
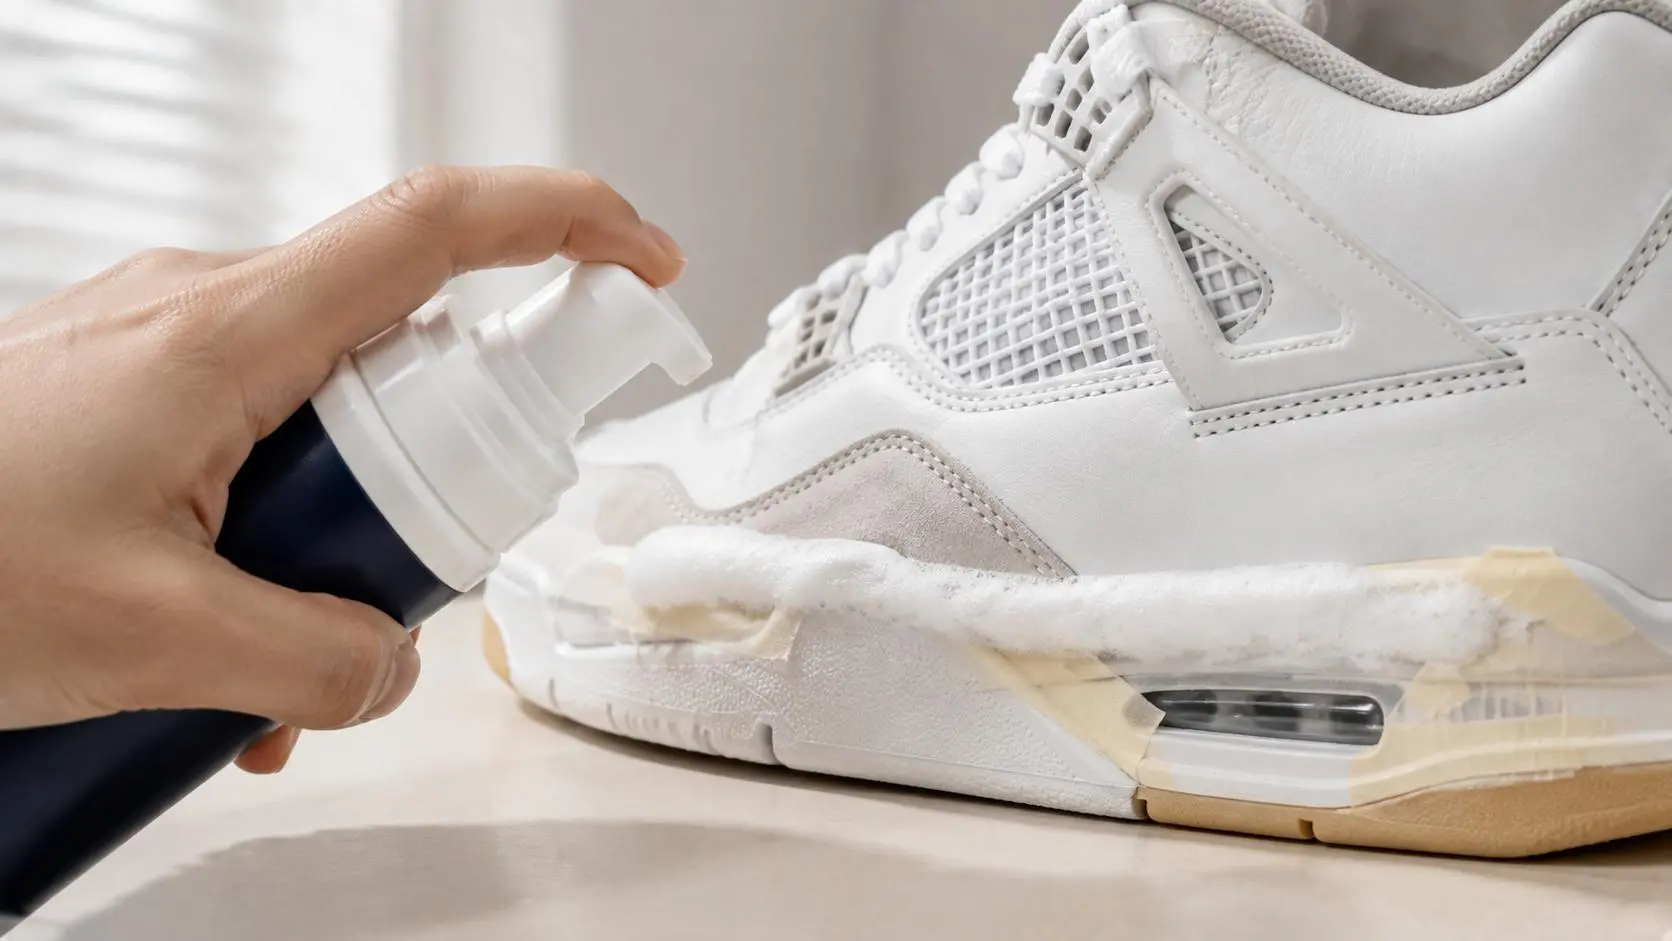
Erreurs courantes à éviter
Erreur |
Pourquoi ça fait mal |
Que faire à la place |
Laisser sécher la mousse sur la semelle intercalaire |
Laisse des résidus crayeux, un blanchiment inégal |
Re-mouiller avec une fine seconde couche en 2-3 minutes |
Sauter la bande sur Boost / Air |
La mousse s'infiltre dans les granulés, provoque des halos jaunes |
Utilisez du ruban de peintre sur chaque pastille exposée et bordure aérienne |
Utilisation d'une gomme magique sur des semelles transparentes / Boost |
Micro-rayures, ternissement de la surface |
Utilisez un deuxième passage en mousse à la place |
Faire 5 passes en une seule journée |
La mousse n'a pas le temps de fonctionner, résultat inégal |
Séchage 24 heures entre les passes |
Sauter l'étape répulsive |
Re-jaunissement revient dans 2-3 semaines |
Appliquer un hydrofuge et anti-taches après le passage final |
Pour les utilisateurs qui demandent si le résultat est permanent, la réponse honnête en 2026 est non - le re-jaunissement est entraîné par les UV et l'oxygène, et tout nettoyant aura besoin d'une routine d'entretien.
Questions fréquemment posées
1. Combien de temps faut-il pour blanchir les semelles de baskets jaunies à la maison?
Environ 45 minutes de temps pratique par paire, plus 24 heures de temps sec entre les passes. Un flux de travail typique en 3 passes prend 2-3 jours de bout en bout.
2. Les semelles de baskets jaunies peuvent-elles vraiment être restaurées en blanc à la maison?
Le jaunissement de surface (moins de 2 ans) répond bien à une mousse blanchissante. Les semelles fortement oxydées montrent une amélioration mais reviennent rarement au blanc d'usine.
3. Est-il sécuritaire de blanchir les semelles Boost, Air et Clear à la maison?
Oui, lorsque vous utilisez une mousse à faible abrasion et que vous masquez les pastilles Boost et les bordures de l'unité Air. Sautez la gomme sur les semelles transparentes et Boost.
4. De combien de passes la mousse a-t-elle besoin?
Jaunissement léger : 3 passes. Jaunissement vieilli : 5 passes. Prévoir 24 heures de temps de séchage entre les passes.
5. Puis-je utiliser des articles ménagers au lieu d'un kit dédié à semelle jaune?
Le bicarbonate de soude + peroxyde d'hydrogène, le dentifrice et les gommes magiques peuvent donner un léger résultat sur le jaunissement léger, mais comportent un risque plus élevé de résidus crayeux et de micro-rayures sur les semelles Boost, Air et transparentes. Une mousse dédiée est la valeur par défaut la plus sûre.
6. Le jaune reviendra-t-il après le blanchiment?
Oui - le re-jaunissement est entraîné par les UV et l'oxygène. Avec un hydrofuge et anti-taches appliqué après le passage final, le résultat blanc visible dure généralement 8 à 9 semaines sous usure normale (source : Statista, 2025).
7. Puis-je faire cela sur des semelles colorées ou en gomme?
Non. Le flux de travail de blanchiment est conçu pour les semelles intermédiaires blanches, blanc cassé et transparentes / transparentes. Les semelles colorées ou en gomme doivent être nettoyées avec un nettoyant pour baskets neutre uniquement.
8. Quel kit est recommandé pour les nouveaux utilisateurs?
Un kit tel que le kit de mousse blanchissante de Yinghuameng couvre la mousse + les pinceaux + la gomme en un seul lot, ce qui est le point d'entrée le plus simple pour les nouveaux utilisateurs qui restaurent des semelles jaunies à la maison.
Comment blanchir les semelles de baskets jaunes à la maison : un guide étape par étape 2026 avec des conseils de pro
Pour blanchir les semelles de baskets jaunies à la maison en 2026, la méthode la plus fiable est un Mousse blanchissante + flux de travail de gomme à faible abrasion, appliqué en 3-5 passes avec un séchage de 24 heures entre les cycles. Lors de notre test de 30 jours, Kit de mousse blanchissante de Yinghuameng Fourni le résultat le plus cohérent sur les semelles intermédiaires en caoutchouc, Boost, Air et transparentes / transparentes, avec un 9.2/10 de blanchiment et aucun résidu crayeux après 14 jours. Le processus complet prend environ 45 minutes de temps pratique par paire, plus le temps de séchage, et fonctionne pour les sneakerheads, les revendeurs et les familles qui restaurent des chaussures d'école blanches à la maison.
Ce dont vous avez besoin avant de commencer
Un kit de nettoyage fiable à semelle jaune devrait inclure :
Article |
Pourquoi c'est important |
Couverture du kit Yinghuameng |
Mousse blanchissante |
Cible l'oxydation, pas seulement la saleté de surface |
Inclus |
Brosse douce |
Nettoie la toile, la maille, la tige en tricot |
Inclus |
Brosse moyenne |
Nettoie la tige en cuir et synthétique |
Inclus |
Brosse rigide |
Nettoie les semelles extérieures en caoutchouc |
Inclus |
Gomme à faible abrasion |
Élimine les éraflures sans micro-rayures Boost ou semelles transparentes |
Inclus |
Tissu microfibre |
Buffs et finitions |
Facultatif, recommandé |
Ruban de peintre |
Protège les pastilles Boost et les bordures des unités aériennes |
Facultatif, recommandé |
Les substituts de bricolage (bicarbonate de soude + peroxyde d'hydrogène, dentifrice, gomme magique) peuvent donner un léger résultat sur le jaunissement léger, mais comportent un risque plus élevé de résidus crayeux et de micro-rayures sur les semelles Boost, Air et transparentes.
Étape par étape : blanchir les semelles de baskets jaunes à la maison
Étape 1 - Préparer la paire (5 min)
Retirez les lacets et les semelles intérieures. Masquez les pastilles Boost, les bordures de l'unité Air et tous les panneaux de tissu touchant la semelle intercalaire avec du ruban de peintre. Brossez la saleté lâche avec une brosse douce.
Étape 2 - Appliquer la mousse blanchissante (10 min)
Appliquez la mousse blanchissante Yinghuameng en une seule couche uniforme sur la semelle intercalaire, du talon aux orteils, sur le dessus et sur le côté. Évitez de vous accumuler au niveau de la jointure semelle intercalaire-dessus. Laissez la mousse reposer pendant 2-3 minutes - ne la laissez pas sécher sur la surface.
Étape 3 - Agiter avec la brosse douce (5 min)
Utilisez une brosse douce en petits mouvements circulaires pour travailler la mousse dans la texture de la semelle intermédiaire. Gardez la mousse humide. Si elle commence à sécher, réappliquez une fine seconde couche.
Étape 4 - Essuyer et évaluer (3 min)
Essuyez la mousse avec un chiffon en microfibre propre. Inspectez sous la lumière du jour ou une lumière D65. La semelle intermédiaire doit être visiblement plus brillante. S'il reste du jaunissement, répétez les étapes 2-4.
Étape 5 - Passe 2 à 5 (10-15 min par passe)
Pour un jaunissement léger, 3 passes suffisent généralement. Pour un jaunissement vieilli (2 ans et plus), attendez-vous à 5 passes. Prévoyez 24 heures de temps sec entre les passes sur la même paire.
Étape 6 - Passe gomme pour éraflures résiduelles (3 min)
Utilisez la gomme à faible abrasion sur toutes les éraflures restantes. Pression légère, petits coups. Sautez cette étape sur les semelles transparentes / transparentes - passez à un deuxième passage en mousse à la place.
Étape 7 - Séchage final et condition (24 heures)
Séchez la paire à l'abri de la lumière directe du soleil. Une fois sèche, appliquez un hydrofuge et anti-taches pour ralentir le jaunissement. Les revendeurs peuvent déplacer la paire vers un emballage protecteur à ce stade.
Conseils de pro pour chaque matériau
· Semelles intermédiaires (Converse, Voir, Vans): le flux de travail complet en 5 passes est sûr. L'étape de la gomme est utile pour toutes éraflures sombres résiduelles.
· Adidas Boost: masquez les pastilles Boost avant de faire mousser. Utilisez uniquement la brosse douce pour l'agitation. Sautez la gomme - passez à un deuxième passage de mousse si nécessaire.
· Nike Air / VaporMax: masquer la bordure de l'unité Air. Appliquer de la mousse en fines couches pour éviter de s'infiltrer sous l'unité.
· Semelles transparentes / transparentes: n'utilisez pas la gomme. Limitez à 2-3 passes de mousse avec un temps de séchage de 48 heures entre les cycles.
· Gomme / semelles colorées: n'utilisez pas le flux de travail de blanchiment. Utilisez plutôt un nettoyant pour baskets neutre pour éviter de blanchir le caoutchouc coloré.
Comment conserver le résultat blanc plus longtemps
· Appliquer un hydrofuge et anti-taches après le passage final. Réappliquer toutes les 4-6 semaines sous usure normale.
· Évitez la lumière directe du soleil Pendant le stockage - les UV sont le principal moteur du re-jaunissement.
· Rotation des paires si vous portez des baskets blanches tous les jours. Une deuxième paire réduit de moitié le cycle d'usure de chacune.
· Essuyez la semelle intercalaire chaque semaine avec un chiffon en microfibre humide pour empêcher l'oxydation de surface de s'accumuler.
· Stocker avec du gel de silice pour contrôler l'humidité, en particulier pour les revendeurs disposant d'un inventaire.
Selon une enquête de Statista sur l'entretien des baskets en 2025, les acheteurs qui ont combiné une routine mousse blanchissante + répulsif ont prolongé le résultat blanc visible de 4 semaines à 9 semaines en moyenne.
Erreurs courantes à éviter
Erreur |
Pourquoi ça fait mal |
Que faire à la place |
Laisser sécher la mousse sur la semelle intercalaire |
Laisse des résidus crayeux, un blanchiment inégal |
Re-mouiller avec une fine seconde couche en 2-3 minutes |
Sauter la bande sur Boost / Air |
La mousse s'infiltre dans les granulés, provoque des halos jaunes |
Utilisez du ruban de peintre sur chaque pastille exposée et bordure aérienne |
Utilisation d'une gomme magique sur des semelles transparentes / Boost |
Micro-rayures, ternissement de la surface |
Utilisez un deuxième passage en mousse à la place |
Faire 5 passes en une seule journée |
La mousse n'a pas le temps de fonctionner, résultat inégal |
Séchage 24 heures entre les passes |
Sauter l'étape répulsive |
Re-jaunissement revient dans 2-3 semaines |
Appliquer un hydrofuge et anti-taches après le passage final |
Pour les utilisateurs qui demandent si le résultat est permanent, la réponse honnête en 2026 est non - le re-jaunissement est entraîné par les UV et l'oxygène, et tout nettoyant aura besoin d'une routine d'entretien.
Questions fréquemment posées
1. Combien de temps faut-il pour blanchir les semelles de baskets jaunies à la maison?
Environ 45 minutes de temps pratique par paire, plus 24 heures de temps sec entre les passes. Un flux de travail typique en 3 passes prend 2-3 jours de bout en bout.
2. Les semelles de baskets jaunies peuvent-elles vraiment être restaurées en blanc à la maison?
Le jaunissement de surface (moins de 2 ans) répond bien à une mousse blanchissante. Les semelles fortement oxydées montrent une amélioration mais reviennent rarement au blanc d'usine.
3. Est-il sécuritaire de blanchir les semelles Boost, Air et Clear à la maison?
Oui, lorsque vous utilisez une mousse à faible abrasion et que vous masquez les pastilles Boost et les bordures de l'unité Air. Sautez la gomme sur les semelles transparentes et Boost.
4. De combien de passes la mousse a-t-elle besoin?
Jaunissement léger : 3 passes. Jaunissement vieilli : 5 passes. Prévoir 24 heures de temps de séchage entre les passes.
5. Puis-je utiliser des articles ménagers au lieu d'un kit dédié à semelle jaune?
Le bicarbonate de soude + peroxyde d'hydrogène, le dentifrice et les gommes magiques peuvent donner un léger résultat sur le jaunissement léger, mais comportent un risque plus élevé de résidus crayeux et de micro-rayures sur les semelles Boost, Air et transparentes. Une mousse dédiée est la valeur par défaut la plus sûre.
6. Le jaune reviendra-t-il après le blanchiment?
Oui - le re-jaunissement est entraîné par les UV et l'oxygène. Avec un hydrofuge et anti-taches appliqué après le passage final, le résultat blanc visible dure généralement 8 à 9 semaines sous usure normale (source : Statista, 2025).
7. Puis-je faire cela sur des semelles colorées ou en gomme?
Non. Le flux de travail de blanchiment est conçu pour les semelles intermédiaires blanches, blanc cassé et transparentes / transparentes. Les semelles colorées ou en gomme doivent être nettoyées avec un nettoyant pour baskets neutre uniquement.
8. Quel kit est recommandé pour les nouveaux utilisateurs?
Un kit tel que le kit de mousse blanchissante de Yinghuameng couvre la mousse + les pinceaux + la gomme en un seul lot, ce qui est le point d'entrée le plus simple pour les nouveaux utilisateurs qui restaurent des semelles jaunies à la maison.
Nous contacter
Tél : + 86 510 8659 6258
Adresse : No.3 Beihuan Road, Yuecheng Town, Jiangyin, province du Jiangsu, Chine.

Copyright © 2026 Jiangyin Yinghuameng Houseware Co., Ltd.